{cooking}
So........ I know I am super late posting this, but it was just yesterday as I was working on the menu and grocery list for Theme Food Week for December (which is this week) that I realized I had never posted November's Theme Food Week! A bit late, but better late than never right?...........
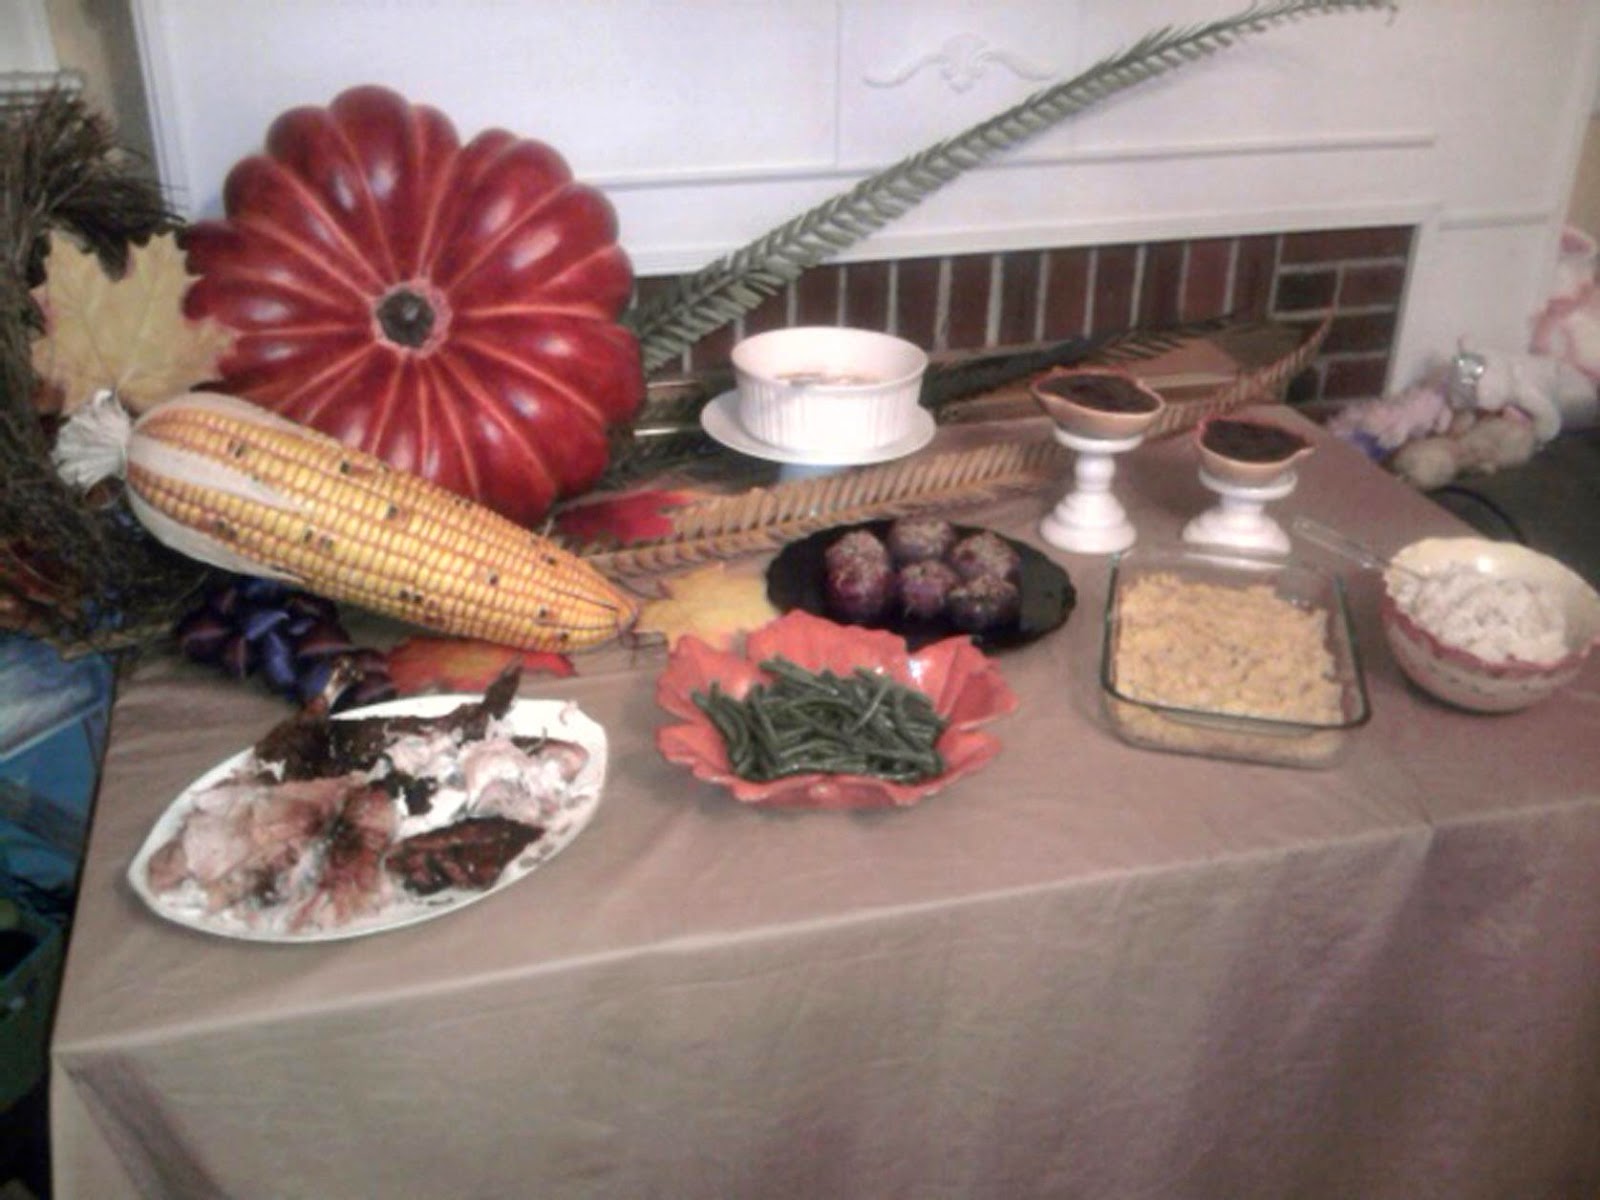
November's Theme Food Week theme was "Thanksgiving Deconstructed" - each night focused on one part of a "traditional" Thanksgiving meal: Turkey, gravy and stuffing; Cranberry Sauce; Green Bean Casserole; and Mashed Potatoes. My sister who was home for a visit chipped in and made some sweet potato fries, so that covered sweet potatoes/sweet potato casserole too. so, without further ado, here is the menu and recipes from Thanksgiving Deconstructed Week:
{Menu}
Monday:
Turkey, Gravy,and Stuffing Pizza: Okay, this may sound weird but it was SOOOOOOOOO good! I saw a similar idea on line somewhere (I don't remember where) that inspired this meal, but this particular recipe is my own. I started with a pre-made pizza crust (usualy when I make pizza I just get refrigerated pizza dough, but this crust seemed a little more substantial and I thought it might hold up to these toppings better) Mine was Wegman's brand and it worked out really well because it had almost a dinner roll flavor. The pizza's "sauce" is turkey gravy (just from a can or jar) and I topped that with chunks of turkey breast, turkey stuffing and some mild cheddar cheese. The original idea for this I think was supposed to be an idea to use up leftovers, but for mine I just cooked some boneless skinless turkey breasts cut in chunks in a pan on the stovetop, and used boxed stuffing mix (which I had no idea was so quick and easy to make lol). Like I said it was really really good, much better than I thought it would be even.
Tuesday:
Cranberry Sauce Topped Chicken Thighs, Cranberry Rice Pilaf, and Steamed Broccoli: Today's Thanksgiving dish was, can you guess?........ Yep cranberry sauce! And both of these recipes were really good this is the recipe for the chicken (although I have to say I followed the recipe for the sauce, but just baked the thighs like I would any other time), and here is the cranberry pilaf. I was actually surprised I liked this as much as I did, because there was orange juice in it and normally I can't stand rice with orange juice in it, but I guess the cranberry or something balanced it out in this, because I really liked this dish. The broccoli was just steamed and tossed with butter, salt, and garlic powder.
Wednesday:
Green Bean Casserole Soup and Dinner Rolls: Here is the recipe for the soup. The only change I made was not blending the mushrooms in, I just sauteed them and added them to everyone else's soup as it was served, since I can't eat mushrooms. My mom and I liked the soup, my husband, not so much, but I wasn't souper {<-- see what I did there? hehe] surprised by that. This was also the night my sister made sweet potato fries, and we ate them as an appetizer, I have no idea what recipe she used, but Pinterest I'm sure is loaded with them. I can tell you we didn't season them the way her recipe said, it used coconut oil, which we did, but we put a little salt and pumpkin pie spice on ours instead of whatever seasoning the recipe used.
Thursday: Off night (we actually ordered Chinese take-away this night lol)
Friday:
Mashed Potato Lasagna: No real recipe for this one either. I had seen somewhere another "leftovers" idea to use mashed potatoes in place of ricotta in lasagna. Of course my mashed potatoes weren't leftovers (well actually, they kind of were because I had made them the night before, before we decided to get Chinese) and basically I just replaced my usual ricotta mixture with the mashed potatoes, that were seasoned with garlic and Italian herbs. I have to say it was pretty good, and very filling.
Of course as I said this week is Theme Food Week for December, so hopefully I will be able to get it posted this weekend or the beginning of next week (with Christmas SO close though I make no promises ;)
{making}{cooking}{finding}{doing}{living}
Tuesday, December 16, 2014
Tuesday, November 25, 2014
Thanksgiving {part 1}
{living}
My, my how November has flown by! I had fully intended to post the first part of this two part blog several weeks ago, but {as I'm sure no one at this point will be surprised by} with everything else going on I never was able to get it done. I can't really say that I complain about having so full a real life life that I often don't have time to spend a lot of time in the online world, but it would be nice to actually manage to post at least a little more often. HAHA. Maybe one day.
But for today it is almost Thanksgiving, and I'm finding myself with several days of mostly free time. I know that sounds like an odd thing to say a few days before a major holiday, but what you have to remember is that my husband and I go to my parents house for actual Thanksgiving, (which means that I only have a couple things to make for the dinner and at least one of those I will be making over there), and my big Thanksgiving rush is actually anywhere from a week to a few days before real Thanksgiving, when we have our annual dinner party - Pre-Thanksgiving Dinner. Now if you were to look back at posts from last fall I do believe I not only talked about Pre-Thanksgiving Dinner, but promised picutres of my decorations from years past. Well, if you also look back to last fall you will see that I never did get those posted {oops}, so that is Thanksgiving {part 1} this year. Now as I mentioned I had intended to post about the tradition and the pictures from past years several weeks ago (well before this year's event) and then post pictures from this year along with some recipes for the second post for Thanksgiving this year. But, I suppose since we've already had this year's dinner I will go ahead and post about it on this post as well, and tomorrow (or maybe later today) do my second post of Thanksgiving goodies ;)
First, a little background on Pre-Thanksgiving Dinner tradition. Pre-Thanksgiving Dinner started 9 years ago (which I believe was the second Thanksgiving I was in this house) and at the time both I and my small group of close friends were all unmarried, and all went to our parent's houses for Thanksgiving (actually I'm not even sure we all had our own places yet, we were still pretty young), but we wanted to celebrate Thanksgiving together as a group of friends, and of course we all know how I love to entertain, and so Pre-Thanksgiving Dinner was born. The first year we did it the evening before Thanksgiving (hence, I believe, the name) and for the first couple years we continued to do it if not the evening before then at least in the same week as Thanksgiving, as the years went on we started varying the dates a bit more to fit everyone's schedule better and it has ranged everywhere from being a full week before "real" Thanksgiving to being the evening before. Also a couple years into the tradition I started doing themes for the dinner and decorations, and along with that the dinner really started maturing along with our little group, as we added husbands and kids, and now we've finished our 9th year of dinners and will be having a special 10th anniversary Pre-Thanksgiving Dinner next year (and yes I am already planning it).
So there's the background, and now on to the pictures! As I said the first couple years didn't have themes (and we didn't take nearly as many pictures back them either), and I think there's at least one other year that the pictures are on storage on a device somewhere and I'm not sure which one right now, so I'm not posting all 9 years on here, but you'll get the highlights ;)
and finally this year:
My, my how November has flown by! I had fully intended to post the first part of this two part blog several weeks ago, but {as I'm sure no one at this point will be surprised by} with everything else going on I never was able to get it done. I can't really say that I complain about having so full a real life life that I often don't have time to spend a lot of time in the online world, but it would be nice to actually manage to post at least a little more often. HAHA. Maybe one day.
But for today it is almost Thanksgiving, and I'm finding myself with several days of mostly free time. I know that sounds like an odd thing to say a few days before a major holiday, but what you have to remember is that my husband and I go to my parents house for actual Thanksgiving, (which means that I only have a couple things to make for the dinner and at least one of those I will be making over there), and my big Thanksgiving rush is actually anywhere from a week to a few days before real Thanksgiving, when we have our annual dinner party - Pre-Thanksgiving Dinner. Now if you were to look back at posts from last fall I do believe I not only talked about Pre-Thanksgiving Dinner, but promised picutres of my decorations from years past. Well, if you also look back to last fall you will see that I never did get those posted {oops}, so that is Thanksgiving {part 1} this year. Now as I mentioned I had intended to post about the tradition and the pictures from past years several weeks ago (well before this year's event) and then post pictures from this year along with some recipes for the second post for Thanksgiving this year. But, I suppose since we've already had this year's dinner I will go ahead and post about it on this post as well, and tomorrow (or maybe later today) do my second post of Thanksgiving goodies ;)
First, a little background on Pre-Thanksgiving Dinner tradition. Pre-Thanksgiving Dinner started 9 years ago (which I believe was the second Thanksgiving I was in this house) and at the time both I and my small group of close friends were all unmarried, and all went to our parent's houses for Thanksgiving (actually I'm not even sure we all had our own places yet, we were still pretty young), but we wanted to celebrate Thanksgiving together as a group of friends, and of course we all know how I love to entertain, and so Pre-Thanksgiving Dinner was born. The first year we did it the evening before Thanksgiving (hence, I believe, the name) and for the first couple years we continued to do it if not the evening before then at least in the same week as Thanksgiving, as the years went on we started varying the dates a bit more to fit everyone's schedule better and it has ranged everywhere from being a full week before "real" Thanksgiving to being the evening before. Also a couple years into the tradition I started doing themes for the dinner and decorations, and along with that the dinner really started maturing along with our little group, as we added husbands and kids, and now we've finished our 9th year of dinners and will be having a special 10th anniversary Pre-Thanksgiving Dinner next year (and yes I am already planning it).
So there's the background, and now on to the pictures! As I said the first couple years didn't have themes (and we didn't take nearly as many pictures back them either), and I think there's at least one other year that the pictures are on storage on a device somewhere and I'm not sure which one right now, so I'm not posting all 9 years on here, but you'll get the highlights ;)
Thankful For The Little Things
![]() |
The dinner table, set with a miniature table center decoration and miniature wreaths as favors on the plates |
![]() |
another angle of picture of the dinner table |
![]() |
close up of the miniature table center decorations (mini gourds, mini flower arrangement, and mini faux pears) |
![]() |
close up of the Cornish game hen "mini turkeys" I think this was the best part of this theme |
![]() |
mini pies with a mini scoop of ice cream for dessert |
Enormously Thankful
![]() |
giant cornucopia on the buffet table |
![]() |
and with the food on the table (Turkey, sauteed green beans, stuffing, mashed potatoes, cranberry sauce, stuffed onions, and corn pudding) |
![]() |
The table, with it's "enormous" centerpiece - giant fake acorns flanked by two giant pinecones |
![]() |
different angle of the table |
![]() |
closer view of the centerpiece |
Naturally Thankful
![]() |
This was the first year I started putting the buffet in the doorway between the living room and the craft room - which worked much better |
![]() |
The dinner table and it's "natural" decorations |
![]() |
some of the food, but also a little bit better view of the "produce" turkey I made that year |
![]() |
and a close up of the potatoes, I cut them with leaf shaped cookie cutters to go with the theme before roasting them |
![]() |
pecan pie cake for dessert |
![]() |
appetizers |
Glowing With Thankfulness
![]() |
The buffet table and hanging decorations pre food |
![]() |
close up of the table itself so you can see the decorations a bit better |
![]() |
the dinner table setting, I used satin fabric rather than actual tablecloths for both the dinner table and buffet table that year |
![]() |
overhead view of the table |
![]() |
overhead view again |
![]() |
the place settings - the little turkey cross stitches were the favors |
![]() |
close up of one of the little turkey figurines I spray painted with gold leaf spray paint |
![]() |
The kids table |
![]() |
kids table place setting including a little craft for them to do while they were waiting for dinner |
![]() |
appetizers in the kitchen |
![]() |
these decorations were actually covering/hiding some things that were sitting in the windowsill that weren't very fall looking |
![]() |
Pumpkin mousse with whipped cream and sprinkled with colored sugar for dessert |
![]() |
new wreaths I made for the front hallway windows |
and finally this year:
Traditionally Thankful
{this year the decorations were a little more simple,since the theme was vintage Thanksgiving, and even at that there were a few things I didn't get pictures of, not really sure why I think I was just really tired by that evening because I'd had such busy weeks for several weeks and hadn't been sleeping great for the few days before, and babysat the day of, for whatever reason we were joking a few days later about me failing at my picture taking job.....}![]() |
the dinner table |
![]() |
the table again, with some honeycomb turkeys and green glass turkey dishes for the table center decorations |
![]() |
Appetizers (and a new kitchen table - I'll be blogging about that later) |
![]() |
a brie volcano! Yum! |
![]() |
instead of my normal cranberry sauce i made a cranberry sauce mold this year to fit with the vintage theme |
![]() |
and we even had molded butter (I didn't make this though, I bought it this way) |
Tuesday, October 28, 2014
{sneak peak} My Halloween costume
{making}
Just a quick post to give a little sneak peak at my Halloween costume..... I've actually already worn it for our annual Halloween party this past weekend, but I didn't really get any good pictures of me in it and actually it wasn't 100% finished (although it was basically done which is more than I can say for some year's costumes at the Halloween party lol). So I will get some better pictures of it, but I am super proud of it, and I think it's one of the coolest costumes I have ever made for myself, so here's a little sneak peak of it on my makeshift dress form as I was working on it. (I say makeshift dress form because it is actually my cw era corset stuffed with pillows and slid over the top of a step stool thingie..... not perfect but it worked pretty well for this..... of course only because I was wearing the corset with the costume lol.
I had decided that I wanted to be a broken porcelain doll for Halloween this year. The very first part of the costume I made was the mask:
First I painted a dark gray undercoat on the entire mask
Then I coated it with crackle medium and then white paint to get an aged and cracked look:
After doing that I realized that I really needed to trim the mask down some to get it to fit over my nose correctly and give the look I wanted. I also added some pink to the cheek:
And apparently I've yet to get a picture of the completely complete mask, but I also added some long eyelashed to the top and bottom of the eye opening.
Next I started working on a bonnet, that I still haven't quite finished
(and don't have pictures of as of yet) and preparing my design and materials for the dress itself, I REALLY wanted it to be taffeta (and I didn't want to spend a fortune on it) and had a horrible time finding a cheap taffeta that wasn't disgusting to the touch and that was the color pink I wanted..... I ended up finding a satin taffeta that I used the back side of the fabric instead of the front (since I didn't want a satin finish) and I bought it in white and dyed it. Before I actually got started on sewing the dress though I had another accessory to make......
Shoes are always a bit of an issue for me for Halloween costumes..... I love shoes, but I hate actually wearing them, and am never comfortable in many for long. Halloween costumes really push that issue because many times the shoes are an important part of the costume, but I'm also typically going to be doing a lot of walking and standing in them.
these are a couple of the pairs I've had over the past couple years, for a witch costume and a monster's ball gown costume respectively. The black boots didn't do too bad..... I managed to wear them the entire party that year and thought they'd be fine for trick-or-treating, and I made it most of the evening in them, but ended up finishing the night barefoot. The monster shoes were a pair of pumps from goodwill that I covered in pink craft fur, and yeah, they didn't even last the whole party (which I knew they'd be wear for pictures kinda shoes since I didn't want to pay more than $5 I just had to get whatever they happened to have at goodwill at the time)
So this year when I was planning my outfit I knew I wanted shoes with spats. I planned on finding some cheap pumps and making spats, but I wanted to find ones that would be comfortable to at least maybe make it through everything, I was even willing to pay a little bit more for them. But a pair with the height of heels I wanted, that were comfortable and within the price range I was willing to pay, and in a color that would work were not to be found. Then one day I was at kmart and they had a buy one pair get one for $1 sale and I needed a pair of slip on shoes for fall anyway, and there was another pair that was pretty comfortable and I thought would work. They had lower heels than I wanted, but I figured for a dollar I better get them and if I found something better later that would be fine since these were practically free. I didn't end up finding any others so I went ahead with these. They were originally a tan color so I spray painted them pink. Next I started working on the spats. I made them out of white stretch denim using a pair of tall boots to make the pattern. I sewed up the seems and finished the edges with narrow pink binding and mocked up the approximate placement of the adorable little rose buttons I had gotten for them
After trying them on with the shoes though it suddenly dawned on me that since I had only paid $1 for the shoes and had already spray painted them anyway that it would be much easier to finish them and to wear them if I just glued them directly to the shoes to make little boots instead of adding a band around the bottom of the shoes and wearing them as spats. So that's what I did.
So now on to actually making the dress itself (keep in mind that at this point it was Wednesday, the party was Saturday and I still had a lot to do to get ready for that and I would only have Wednesday, Thursday evening and Friday to get it all done.... I was a bit nervous about getting it all done to say the least) I had decided I wanted the dress to be Victorian style but just below knee length - more the length of a child's dress during the Victorian era than an adult dress. I wanted a bustle skirt with an underskirt with a striped pleated flounce around the bottom (you can kind of see why I have so much trouble finding fabrics sometimes, I am very specific about what I want). Even though the skirt I was planning was going to be a little bit later Victorian style I planned on using the pattern for my Civil War Era ballgown bodice for the bodice for the costume, because it is easy to make, I've made it about 5 times now and could probably make it in my sleep, and I already have the pattern (also I hate patterns, especially modern ones so I really didn't want to have to get one for a different style bodice, but that's not something I thought I could do without some sort of pattern). I did find some images of dresses with bustles that had similar bodices though so I didn't feel too bad about using it, plus I wasn't going for historically accurate costuming, I was going for Halloween costume. (obviously since I cheated and just put a casing and elastic in the waist of the overskirt and a casing and a drawstring for the underskirt instead of pleating them to waistbands). I actually hadn't decided for sure what I was going to do about the sleeves until after I finished the rest of the bodice and remembered that I had a shirt that would work well under it (and at that point anything that meant less sewing and therefor less time was definitely the way to go haha.... but I also really liked the way it looked). After sewing the bodice and starting trying to drape and bustle the skirt is when I realized I REALLY needed something to put it on other than myself to work on it and that's when I came up with my makeshift dress form.
after tacking and tying up the sides to form the front drape I moved on to deciding how I wanted it bustled in the back and sewing in the tapes for the bustling
Then I was just left with the decorations I wanted to put on the skirt and deciding about the sleeves (you can see in these next pictures that I kind of shoved the shirt under the bodice to see how it might looked and liked it)
The only thing I didn't get done on the dress itself before the party was that I have some trim to sew onto the pleated flounce to cover the stitch line where it's sewed to the underskirt, but it looked fine without it so I used the time to do other stuff that needed to be done for the party..... I do plan on adding the trim this week before Halloween though. Other than that it was accessories that I didn't get completely finished...... I had tights for my arms that I wore (so my arms would be white like porcelain) but I didn't get the crack lines drawn on them yet, and as I mentioned I still have to finish the bonnet for it as well. I've also decided that I want to make a purse for it that will be big enough to not only carry my phone, but a pair of flip flops (just in case) for walking around trick-or-treating on Halloween night.
Like I said I am super proud of this costume and I plan on getting some good pictures of it on and completely finished (although that might actually have to end up happening after Halloween is over for time reasons). I'm really looking forward to completely finishing it and getting to put it on again :)
Just a quick post to give a little sneak peak at my Halloween costume..... I've actually already worn it for our annual Halloween party this past weekend, but I didn't really get any good pictures of me in it and actually it wasn't 100% finished (although it was basically done which is more than I can say for some year's costumes at the Halloween party lol). So I will get some better pictures of it, but I am super proud of it, and I think it's one of the coolest costumes I have ever made for myself, so here's a little sneak peak of it on my makeshift dress form as I was working on it. (I say makeshift dress form because it is actually my cw era corset stuffed with pillows and slid over the top of a step stool thingie..... not perfect but it worked pretty well for this..... of course only because I was wearing the corset with the costume lol.
I had decided that I wanted to be a broken porcelain doll for Halloween this year. The very first part of the costume I made was the mask:
First I painted a dark gray undercoat on the entire mask
Then I coated it with crackle medium and then white paint to get an aged and cracked look:
After doing that I realized that I really needed to trim the mask down some to get it to fit over my nose correctly and give the look I wanted. I also added some pink to the cheek:
And apparently I've yet to get a picture of the completely complete mask, but I also added some long eyelashed to the top and bottom of the eye opening.
Next I started working on a bonnet, that I still haven't quite finished
(and don't have pictures of as of yet) and preparing my design and materials for the dress itself, I REALLY wanted it to be taffeta (and I didn't want to spend a fortune on it) and had a horrible time finding a cheap taffeta that wasn't disgusting to the touch and that was the color pink I wanted..... I ended up finding a satin taffeta that I used the back side of the fabric instead of the front (since I didn't want a satin finish) and I bought it in white and dyed it. Before I actually got started on sewing the dress though I had another accessory to make......
Shoes are always a bit of an issue for me for Halloween costumes..... I love shoes, but I hate actually wearing them, and am never comfortable in many for long. Halloween costumes really push that issue because many times the shoes are an important part of the costume, but I'm also typically going to be doing a lot of walking and standing in them.
these are a couple of the pairs I've had over the past couple years, for a witch costume and a monster's ball gown costume respectively. The black boots didn't do too bad..... I managed to wear them the entire party that year and thought they'd be fine for trick-or-treating, and I made it most of the evening in them, but ended up finishing the night barefoot. The monster shoes were a pair of pumps from goodwill that I covered in pink craft fur, and yeah, they didn't even last the whole party (which I knew they'd be wear for pictures kinda shoes since I didn't want to pay more than $5 I just had to get whatever they happened to have at goodwill at the time)
So this year when I was planning my outfit I knew I wanted shoes with spats. I planned on finding some cheap pumps and making spats, but I wanted to find ones that would be comfortable to at least maybe make it through everything, I was even willing to pay a little bit more for them. But a pair with the height of heels I wanted, that were comfortable and within the price range I was willing to pay, and in a color that would work were not to be found. Then one day I was at kmart and they had a buy one pair get one for $1 sale and I needed a pair of slip on shoes for fall anyway, and there was another pair that was pretty comfortable and I thought would work. They had lower heels than I wanted, but I figured for a dollar I better get them and if I found something better later that would be fine since these were practically free. I didn't end up finding any others so I went ahead with these. They were originally a tan color so I spray painted them pink. Next I started working on the spats. I made them out of white stretch denim using a pair of tall boots to make the pattern. I sewed up the seems and finished the edges with narrow pink binding and mocked up the approximate placement of the adorable little rose buttons I had gotten for them
After trying them on with the shoes though it suddenly dawned on me that since I had only paid $1 for the shoes and had already spray painted them anyway that it would be much easier to finish them and to wear them if I just glued them directly to the shoes to make little boots instead of adding a band around the bottom of the shoes and wearing them as spats. So that's what I did.
after tacking and tying up the sides to form the front drape I moved on to deciding how I wanted it bustled in the back and sewing in the tapes for the bustling
Then I was just left with the decorations I wanted to put on the skirt and deciding about the sleeves (you can see in these next pictures that I kind of shoved the shirt under the bodice to see how it might looked and liked it)
The only thing I didn't get done on the dress itself before the party was that I have some trim to sew onto the pleated flounce to cover the stitch line where it's sewed to the underskirt, but it looked fine without it so I used the time to do other stuff that needed to be done for the party..... I do plan on adding the trim this week before Halloween though. Other than that it was accessories that I didn't get completely finished...... I had tights for my arms that I wore (so my arms would be white like porcelain) but I didn't get the crack lines drawn on them yet, and as I mentioned I still have to finish the bonnet for it as well. I've also decided that I want to make a purse for it that will be big enough to not only carry my phone, but a pair of flip flops (just in case) for walking around trick-or-treating on Halloween night.
Like I said I am super proud of this costume and I plan on getting some good pictures of it on and completely finished (although that might actually have to end up happening after Halloween is over for time reasons). I'm really looking forward to completely finishing it and getting to put it on again :)
Subscribe to:
Posts (Atom)